CHAPTER 8
Color is important. It gives “emotional flavor.”
The color of moonlight

Moonlight is usually painted with a bluish or greenish cast, while it is technically more red than sunlight. What’s up with that?
In dimmer light, blue green hues appear lighter in tone–the Purkinje shift

To effectively paint night scenes, one must train the memory and imagination–can’t really plein-air paint by moonlight, and cameras don’t see things the same way.
Depth of Field

Basically, blur out the background information. When painting, we can focus on every object and make everything have crisp, distinct edges, but that’s not what’s done in photos. It can help draw our attention to what’s most important.
Intersecting Contours
When things overlap, how do you show depth? Blur some edges, leave others crisp. Depending on how you do that, different things will stand out in your image, and a different story will be told.
Painting in Moonlight
Our eyes can’t see well in dim light–we don’t see details like blades of grass or cracks in the sidewalk. Be careful when painting from photo reference–photos can see things the eye won’t see.
Color Constancy
As humans, we don’t see color objectively. Our view of color is very subjective, and we use context clues to figure out what color things are in relation to other things

The two squares with the arrows are actually the same color, though they look very different because of what’s around them.
To try to see colors more accurately, isolate them–look through a hole in a card or through a half-clenched fist.
In imaginative painting, you’ll have to learn how to make things look right by understanding the color of the light source and color of the object, and how they interact.
Successive Contrast: When you look at an object of a certain color, your eyes adjust to that color. The resulting afterimage affects what you look at next–this means that a few areas of complementary color can help enliven a color scheme
Colored Illumination Effects: Reflected light of a different color (0n shadow side) can make the light side appear a different color. We don’t see colors objectively.
Cool Light, Warm Shadows
Five Factors affect the appearance of colors:
- Simultaneous Contrast: Hue/color/saturation/brightness of a background color can induce opposite qualities in an object sitting in front of it.
- Successive Contrast: Looking at one color changes the next color we see.
- Chromatic Adaptation: Our visual system becomes adjusted to a given color of illumination. When illumination changes in color temperature, the sensitivity of color receptors changes in relative proportion, resulting in a balanced impression of color and light levels.
- Color Constancy: Local colors appear consistent, regardless of lighting circumstances that change their hue/color/saturation.
- Size of the Object: Smaller objects appear to have less distinct color.
When painting, COMPARE colors to each other to figure out what they should look like. Compare to a white and black, to a same-value gray, and to a full-chroma version of a hue.
CHAPTER 4
So, you think red, yellow, and blue are the primary colors?
Ha.
Nothing is as simple as it may at first seem. There are lots of different color wheels, and lots of different theories about color. There is red/green/blue of light, CMYK of printing, and lots of other ideas about what the primaries actually are.
Here’s the Yurmby color wheel
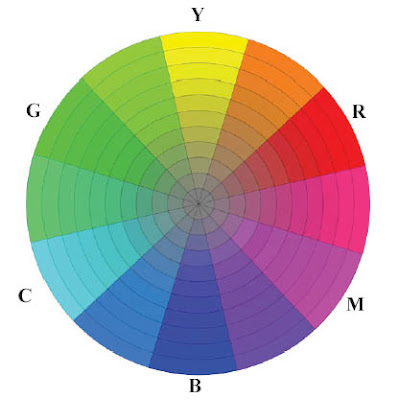
Red Blue and Green are separated by Magenta, Cyan, and Yellow (all are equidistant on the wheel).
Each color is defined by its HUE (where it is around the edge of the color wheel) and its CHROMA (how pure or grayed-out it is).
Peak Chroma Value (see photo above). Yellow is at its highest chroma in lighter colors. Red in the middle values, and blue in the darker.
Local color: Color of the surface of an object as it appears close up in white light. The color you actually mix will usually be different from the local color.
Grays are an artist’s best friend.
“Better gray than garish.” –Dominique Ingres
Try mixing grays from complementary pairs, and use those pairs in the painting as well.
There is no single gray color. Don’t be afraid of grays.
GREEN is a struggle for many artists. It can look weird.
Some tips:
You can get rid of green pigments–make them from mixing blues and yellows. They’ll be weaker and more varied (that’s better).
Avoid monotony–vary your green mixtures.
Use a pink or reddish gray with the greens. “Smuggling reds.”
Prime canvas with pinks/reds so they’ll show through and enliven the greens.
Creating good gradation takes careful color mixing and has a great effect. “Nature will not have one line nor color, nor one portion nor atom of space without a change in it. There is not one of her shadows, tints, or hues that is not in a state of perpetual variation.” — John Ruskin
Here’s some gradation from Ruskin himself:

Tints–add white to make a pastel colors. Offset these with darker values in other areas of the painting for contrast.
2 ways to make tints: add white (makes it more bluish) or add it in a glaze.