Transmitted Light:
When sunlight travels through sin, semitransparent material, the light becomes colored.
4 distinct foliage colors: transmitted light, downfacing shadow, upfacing shadow, and toplit with sun.
Subsurface Scattering:
Lit enters translucent materials (like skin) and spreads out, creating a glow. It affects forms with depth and volume.
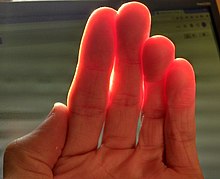
Most dramatic when you’ve got translucent flesh, small forms, and backlighting.
It makes people’s ears look red when backlit and makes the edges of fingers red when held against the sun.
Color Zones of the Face

The differences between the zones of the face are very subtle. More pronounced in men than in women.
More capillaries in the middle region, hence the reddish hue. Fewer veins in the forehead. Stubble and blue-toned veins in the bottom third.
The Hair Secret
To make hair look pretty, don’t draw each individual strand–use big brushes, keep masses simple, soften edges, and control highlights.
Where the hair meets the forehead, look for variations and don’t allow the edges to be too hard.
Visualize masses of hair as ribbons–the highlight goes across (NOT ALONG) the curving shapes.
Short or pulled-back hair creates a highlight that extends across the entire head.
Key light and an edge light can make hair interesting. No set formula for hair because it can be so different for different people.
Caustics

Water in a glass or light going through waves creates a lens which focuses light into spots or lines of light.
From transparent objects, the light bunches up and forms lines of concentration along the boundary of geometric shapes.
Underwater caustics create shapes on the backs of fish or on the sea floor, but they don’t occur much deeper than 20-30 feet. They only happen on sunny days as well.
Caustic reflections can be cast upward from wavelets–you could see them on the underside of a bridge, for example. They can also appear inside concave shiny objects, like cubs or bowls.
Specular Reflections
Shiny objects act like mirrors, reflecting whatever’s around.
specular reflection: light rays bounce off the surface at the same relative angle that they approached it
diffuse reflection: light rays bounce in all direction–typical of a matte surface.
Many objects are a mix of the two…
3 Rules of Specularity:
–The more reflective the surface, the broader the range of values you need to paint it.
–Convex reflective surfaces, such as chrome, reflect a mini view of the scene around the object, often including elements beyond the limits of your composition.
–Specular pattern is a separate layer added on top of the usual modeling factors you use to render the object. (Consider normal modeling factors PLUS specular efffects.)
Highlights
Specular reflections of the light source on wet or shiny surfaces.
Highlights are a combination of the color of the source and the local color of the object.
Annular highlights–like scratches in a metal surface, cobwebs, tree branches catching sunlight.
Color Corona
Surrounds a very bright source, like a setting sun or streetlight. (Called a lens flare in photography.) It’s a region of colorful light, like a halo. Glow takes on the native color of the source. It’s cool because it can make a source seem brighter than the white of the paper, and it can make the viewer squint involuntarily.
Motion Blur
Motion blur–form moves rapidly in front of a stationary observer or camera.
The faster an object is moving, the more it’s blurred. Blur is greatest in relation to the path of the movement.
Speed blur–camera tracks along with a fast-moving object.
Background blurs radially from the vanishing point along the path of movement. Forms closest to the camera blur the most.
Photos vs Observation
Cameras tend to distort light and color. Here’s how things change:
- Deep shadows look black and highlights look white.
- Colors shift/weaken in chroma. Subtle variations between adjacent warm and cool colors are often lost.
- Weak sources, like reflected colors from nearby objects, are lost.
How to use photos without losing color:
- Use your chosen medium to make a color note while on site.
- Turn reference photos into black and white images so you won’t be influenced by photographic color.
- Wait for overcast days when lights/darks aren’t so extreme or use a reflector.
- Take 2 exposures–one for lights and one for darks–and use the two photos for your reference.